Hosted Exchange: Difference between revisions
mNo edit summary |
mNo edit summary |
||
| (One intermediate revision by the same user not shown) | |||
| Line 20: | Line 20: | ||
[[File:HE User Filter.png|none|thumb|933x933px]] | [[File:HE User Filter.png|none|thumb|933x933px]] | ||
== Add New Mailbox == | |||
https://portal.hbscloudservices.com/ > Users > Add > Fill in required fields > Save > Service Management > Add > Exchange 2019 Service > select Available Plan > Save | |||
If the new mailbox needs to receive external email, make sure to add it to Proofpoint. | |||
== Check Mailbox Size and Usage == | |||
Go to https://portal.hbscloudservices.com | |||
Click user's Display Name you would like to check > Service Management > Exchange 2016 Service > Mailbox allocated size. | |||
[[File:Mailbox Size Usage.png|none|thumb|502x502px]] | |||
== Add Extra Mailbox Space == | |||
[https://support.microsoft.com/en-us/office/manage-my-mailbox-size-in-outlook-792b521c-3f4e-404e-b436-9c197bad6f45 Mailbox Cleanup] is the first step to do before adding storage to try and save space. | |||
# Click on '''mailbox''' needing the space change | |||
# Select '''Service Management''' > '''Exchange 2016 Service''' > '''Mailbox allocated size''' | |||
# Using the '''Change Mailbox Size''' drop down select the new size | |||
#* If removing space, ensure there is enough free space to remove | |||
# Click '''Save''' | |||
''Customer will be billed accordingly when end of month report is run.'' | |||
== Setup Email Forwarding == | |||
Go to https://portal.hbscloudservices.com | |||
# Click on user you want to setup the forward for | |||
# Service Management > Exchange 2016 Service > Forwarding Address | |||
# Here you will specify an existing object: Forwarding Address > select recipient object > Select > Save | |||
# Or Create Contact For Forwarding > enter Display Name, Target (External) Email Address, Internal Email (unique address), & set Use Contact Target Address As Primary Address to Yes > Save > Forwarding Address > select your newly created contact > Select > Save | |||
== Hosted Exchange Remote Wipe Device == | |||
# 1. Sign in to webmail at https://webmail.hbscloudservices.com or <nowiki>https://webmail.YOURDOMAIN.COM</nowiki> | |||
# 2. Select “Options” in the upper right corner. | |||
# 3. Select “See All Options…” | |||
# 4. On the left hand side, Select “Phone” | |||
# 5. Select the device you would like to be wiped, and select “Wipe Device” | |||
# 6. A dialog box will pop up to confirm if you would like to wipe the device. Answer accordingly. | |||
== Hosted Exchange Email Relay == | |||
* SMTP Server: smtp.hbscloudservices.com | |||
* Port: 587 | |||
* TLS | |||
* Authentication: yes (must use a mailbox listed in customer panel) | |||
* "From:" field must use the same email address you used to authenticate or any alias assigned to that mailbox. | |||
== Hosted Exchange DNS == | |||
Below are the DNS records for setting up Hosted Exchange. MX & smtp records are only needed if there is no spam filter. | |||
{| class="wikitable" | |||
!Record | |||
!Type | |||
!Value | |||
|- | |||
|@ | |||
|MX | |||
|mx1-us1.ppe-hosted.com. | |||
mx2-us1.ppe-hosted.com. | |||
|- | |||
|@ | |||
|TXT | |||
|"v=spf1 include:spf.hbscloudservices.com -all" | |||
|- | |||
|smtp | |||
|A | |||
|64.25.115.181 | |||
|- | |||
|autodiscover | |||
|A | |||
|64.25.115.182 | |||
|- | |||
|webmail | |||
|CNAME | |||
|webmail.hbscloudservices.com. | |||
|} | |||
Latest revision as of 15:15, 28 August 2025
Go back to Main Page
Outlook 2010 will NO longer be supported. Current users must upgrade, and new customers must use 2013 or later.
- OWA URL: https://webmail.hbscloudservices.com
- Email Settings for Android
- Email Settings for iPhone
- Password Change OWA
- Password Change Portal
- Password Enforced Change
- Password iPhone Update
- Password Android Update
- Recover deleted items in Outlook
User Count/Amount Billed
Reports will be run last day of each month. If it's a weekend or holiday, reports will be run next business day.
Go get started go to https://portal.hbscloudservices.com - You must be granted company admin rights.
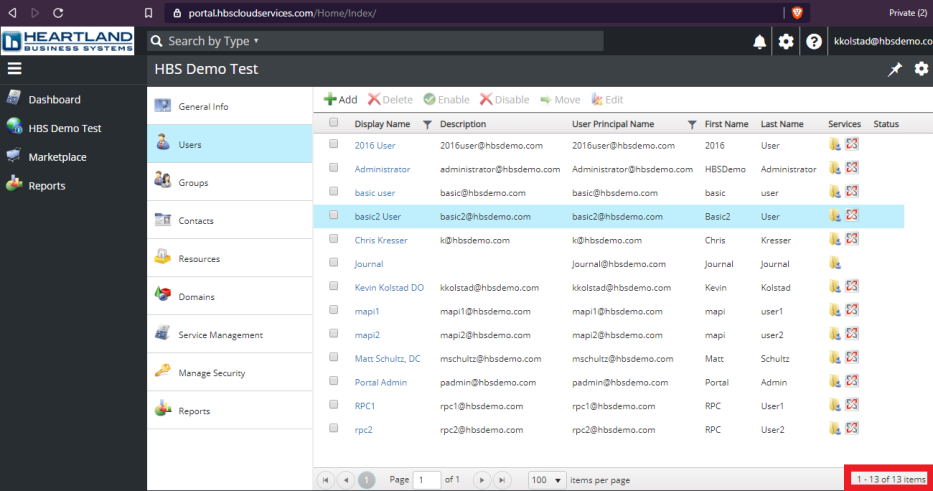
Go to the User tab and look at the bottom right count, subtract any users without the Exchange logo/service.

Add New Mailbox
https://portal.hbscloudservices.com/ > Users > Add > Fill in required fields > Save > Service Management > Add > Exchange 2019 Service > select Available Plan > Save
If the new mailbox needs to receive external email, make sure to add it to Proofpoint.
Check Mailbox Size and Usage
Go to https://portal.hbscloudservices.com
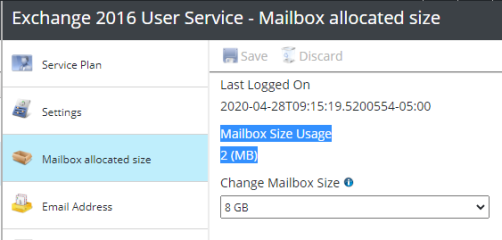
Click user's Display Name you would like to check > Service Management > Exchange 2016 Service > Mailbox allocated size.

Add Extra Mailbox Space
Mailbox Cleanup is the first step to do before adding storage to try and save space.
- Click on mailbox needing the space change
- Select Service Management > Exchange 2016 Service > Mailbox allocated size
- Using the Change Mailbox Size drop down select the new size
- If removing space, ensure there is enough free space to remove
- Click Save
Customer will be billed accordingly when end of month report is run.
Setup Email Forwarding
Go to https://portal.hbscloudservices.com
- Click on user you want to setup the forward for
- Service Management > Exchange 2016 Service > Forwarding Address
- Here you will specify an existing object: Forwarding Address > select recipient object > Select > Save
- Or Create Contact For Forwarding > enter Display Name, Target (External) Email Address, Internal Email (unique address), & set Use Contact Target Address As Primary Address to Yes > Save > Forwarding Address > select your newly created contact > Select > Save
Hosted Exchange Remote Wipe Device
- 1. Sign in to webmail at https://webmail.hbscloudservices.com or https://webmail.YOURDOMAIN.COM
- 2. Select “Options” in the upper right corner.
- 3. Select “See All Options…”
- 4. On the left hand side, Select “Phone”
- 5. Select the device you would like to be wiped, and select “Wipe Device”
- 6. A dialog box will pop up to confirm if you would like to wipe the device. Answer accordingly.
Hosted Exchange Email Relay
- SMTP Server: smtp.hbscloudservices.com
- Port: 587
- TLS
- Authentication: yes (must use a mailbox listed in customer panel)
- "From:" field must use the same email address you used to authenticate or any alias assigned to that mailbox.
Hosted Exchange DNS
Below are the DNS records for setting up Hosted Exchange. MX & smtp records are only needed if there is no spam filter.
| Record | Type | Value |
|---|---|---|
| @ | MX | mx1-us1.ppe-hosted.com.
mx2-us1.ppe-hosted.com. |
| @ | TXT | "v=spf1 include:spf.hbscloudservices.com -all" |
| smtp | A | 64.25.115.181 |
| autodiscover | A | 64.25.115.182 |
| webmail | CNAME | webmail.hbscloudservices.com. |